Posted by Elly Keen - Daydream Green
26th Mar 2025
A Quick Guide to Soil Blocking for Cut Flowers

Like any good gardener, your seed packet collection may have tripled in size over the summer as you eagerly pinned hundreds of photos on your “Cut Flower Garden” mood board.
Now the time has come to sow and you are left wondering whether your portable nursery greenhouse is going to cut the mustard. With traditional trays, you’d be lucky to squeeze in 100 of your favourites. And I can see you sweating now cause trust me, you have more favourites than that. Much more.
Take a deep breath garden besties, what if I told you, there was another way.
Yup, leave the greenhouse shuffle a thing of the past this Autumn because Soil Blocking is the new, space saving hack that every gardener needs in their life.
2025 was the year I vowed never to run out of space again and finally kicked up the courage to give soil blocking a go. Admittedly, I was intimidated because you see I’ve never really been any good at baking and honestly, those blocks looked strangely like my favourite chocolate brownie recipe.
Hesitantly, I decided to put my big girl pants on and just give it a go. Failure or not I was not going to let another autumn go by without trying this, supposedly ‘revolutionary’ sowing technique.
What is Soil Blocking?
Soil blocking is a way of starting seeds in compacted soil rather than plastic pots or trays. You may think this is a newly invented way of sowing but in reality, soil blocking has been around for centuries.
You see there is evidence to suggest that Aztec used 'soil blocks’ in their floating gardens of Mexico City. Basically, they would take nutrient dense mud and sediment from lake beds and form soil cubes to grow their vegetable seedlings in. Cool right?
This ancient old technique was modernised with the invention of a specialised hand blocking tool by engineer, Michael Ladbrooke and proved hugely popular with European growers. Following a resurgence in the 1970s to the American market, the rest is history.
What are the benefits of Soil Blocking?
With so many benefits of soil blocking, it is easy to see why gardeners all around the globe are adopting this technique.
SPACE SAVING - This idea of growing more seeds in less space is what appealed to me initially about Soil Blocking. As a micro flower farmer, I am sowing thousands of seeds in Autumn and I do so without the use of a traditional greenhouse set up.
Like many home gardeners, I’m limited on space. My propagation room is a couple of shelves, grow lights and heat mats in my garage and believe me when I say that the juggle is real.
Enter the micro soil blocker. With this little gem, you can fit 120 seedlings onto one tray! And when my standard shelf holds 10 trays, well, you do the math.
EFFICIENT - In the past, I have had to sow into punnets and then was dealt the laborious task of pricking out all the seeds I thought it was a good idea to sow.
I’m ashamed to admit, many times my pricking out was delayed. Leaving seedlings rather shocked and stunted when the time came to transplant. But with soil blocking there is no need to prick out.
That part of the sowing process is completely gone – forever! This speeds up the process and makes the whole journey from seed to transplant just so much more efficient.
HEALTHIER SEEDLINGS - Because the seedlings do not have to go through a pricking out process, they are ultimately subjected to less root disturbance and transplant shock.
Traditional practices of growing seedlings into cells can also leave the seedling root bound. Roots grow downwards and then circle around the pot. This makes it harder for the plant to settle once transplanted into the garden.
With soil blocking the roots are air pruned. This means when they hit the side of the block (dry air) they stop growing in that direction and instead develop more lateral (horizontal) roots from the main stem. This results in a more branched, compact and healthy root system.
SUSTAINABLE - Of course, without the need of plastic pots, this practice of Soil Blocking is a lot more sustainable. Plastic pots tend to disintegrate over time and need replacing. With the soil blocking tool, you will buy this once and it will last you a lifetime.
Everything you need to get Soil Blocking
Materials:
- Soil Blocker Micro 20
- Soil Blocker Mini 4 or Mini 5 (depending on your preference) - DIY soil blocker mix (see recipe below)
- Cafeteria tray
- Sistema tub
- Brick trowel
- Seeds
- Vermiculite
- Heat mat (optional)
- Grow lights (optional)
The Nitty Gritty on Soil Blocking Tools
When it comes to selecting a hand-held soil blocking tool, there are many options on the market but through my research I found that the OG Ladbrooke, designed and manufactured in the UK is the absolute best money can buy.
This soil blocker is a must, especially for small-space gardeners and if you can only afford one soil blocker then this would be my recommendation. The tool makes 20 cubes of 2 x 2cm and is ideal for starting your small cut flower seeds that require light to germinate.
The Micro 20 also has the added benefit of needing less soil to make the cubes which is why I prefer them and will only use the Mini 4 or 5 for larger seeds or when you need to pot on.
The Mini 4 or Mini 5 Soil Blocker makes 4 or 5, 5 x 5cm cubes of soil.
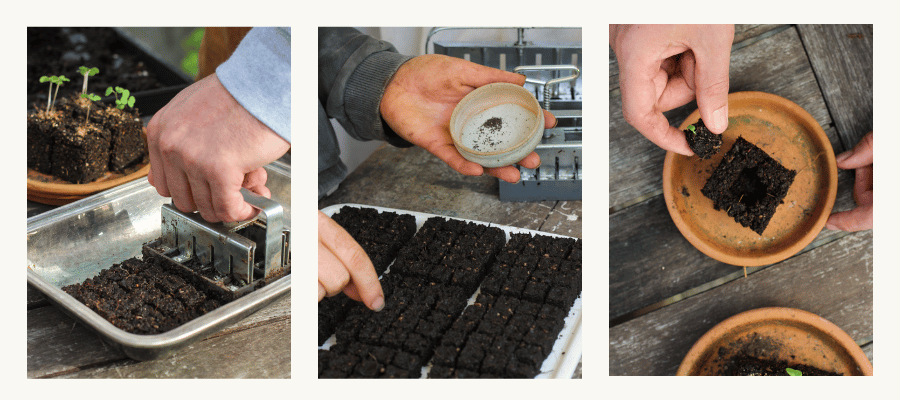
The Mini 4 Soil Blocker is needed to ‘pot on’ your Micro Blocks prior to planting out (however you may choose to skip this step, but it requires getting your timing just right!).
The Mini 5 soil blocker is ideal for larger seeds like Sweet Peas that need to be buried underneath the soil. If you are sowing vegetable seeds then you will likely need this size to accommodate large seeds like Cucurbits, Legumes and Tomatoes.
Seed pins are included in the Mini Soil Blocks, but you will need to purchase Cube Inserts and Dowel Pins separately.
Seed Pins - create small holes into the soil block for sowing your seeds directly into. Dowel Pins - create deeper holes suitable for larger seeds and cuttings.
Cube Insert (compatible with the Mini 4 only) - When fitted into the Soil Blocker - Mini 4, the Cube Inserts make a square hole to ‘pot on’ seedlings started in the Soil Blocker - Micro 20.
DIY Soil Blocking Recipe (makes 24 micro soil blocks, total of 240 seedlings)
- 6 cups Seed raising mix or weed free garden soil
- 6 cups Coconut coir
- 3 cups Compost
- 1 1/2 cups Perlite or Coarse Sand
- Worm castings (optional)
There are many recipes available, and I recommend experimenting with different ingredients to find what works for you. Personally, I prefer using seed raising mix to garden soil and the reason is, I find it difficult to source weed-free topsoil. If you are a beginner grower, things can get confusing if weeds begin to sprout in your seed blocks. I have been known in the past to nurture a weed seed for many months before realising, so something to bear in mind.
The other reason I like seed raising mix is that is has the right amount of added nutrients for the little seeds, meaning you do not need to add any amendments. A lot of recipes call for added fertilisers but I prefer seaweed feeds every week until planting in the garden. (Remember too much fertiliser can cause more damage to a seedling than none at all.)
Worm castings are icing on the cake if you have them as they will inoculate your soil blocks with beneficial microbes from the beginning and further strengthen the health of your seedling.

How to Make the Soil Blocks
1. Start by soaking your coconut coir block in water according to instructions.
2. Mix the DIY Soil Block recipe ingredients together in a large sistema tub.
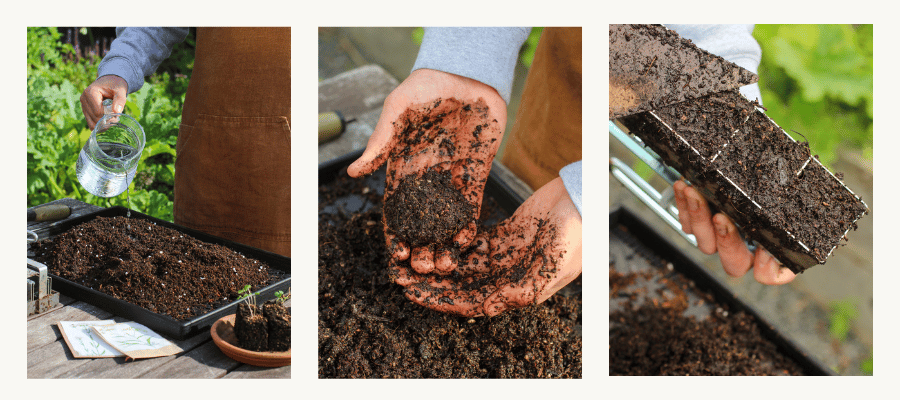
3. Add water a small amount at a time, mixing as you go. Soil blocks need to be wetter than traditional seed trays, but you have to pay attention not to overwater or the soil won’t stick together.
The best way to tell if you have added enough water is to pick up the soil in your hand, give it a good squeeze so water runs off and then release. If it sticks together, you are ready to go. If it crumbles or water does not run out when squeezing, you need more liquid!
4. Next make a pile of soil in your tub and press the tool into the soil. Hold down firmly, twisting slightly as you do so to compress the soil inside. This may take you a couple of tries to get your technique right but as you do, you’ll notice water seeping from the top of the soil blocker, and you will know it is firmly compressed inside.
5. Lift the soil blocker up and have a look underneath. You may find the soil has mounded slightly and this is where the brick trowel comes in handy. Take the trowel and scrape the excess from the bottom creating a smooth surface. You can also use this trowel to further compact the soil inside the blocks.
6. Place the soil blocker on a clean, cafeteria tray and release the spring by pressing down on the handle. Go carefully, as to no knock your blocks and break them. This may take a couple of attempts. If you need to redo any, simply use the trowel to pick them up and place them back in the soil mix.
7. Once you have made all your soil blocks it is time to sow the seeds.
It is no different to sowing in pots or trays. Make sure to read the instructions and sow at the correct depth. For small seeds like Snapdragons and Poppies, you must surface sow. Only covering with a fine dusting of vermiculite as they need light for germination. For seeds like Larkspur or Phlox, these need darkness and therefore you must bury the seed or place the whole tray in a dark cupboard until germination occurs.
*helpful tip, when sowing seeds make sure to group seeds with similar germination times on the same tray!
8. Place trays into a clean sistema tub and position in an area with consistent warmth + light to aid germination. If you do not have access to a heat mat or grow lights, then you can use a warm room with ample light from a window etc until germination occurs then move outdoors inside the tubs to grow on. Maximum light following germination is essential to prevent seedlings from becoming leggy.
Watering Tips
Watering is probably one of the most important parts of the whole process and can take some getting used to if you have only used pots before. Soil blocks will dry out more quickly than pots or cells do. You need to be mindful of this and prepared to water daily.
The sistema tub will keep up humidity (which is essential for germination). But still the blocks will dry out without additional water. I prefer to bottom water, to do this fill the cafeteria tray with a cup or so of water daily for the blocks to soak up.
Care must be taken with using a hose or watering can if watering from above. Fine seeds can easily become dislodged and therefore if you do prefer watering from above, using a mist setting or spray bottle is recommended.
What’s Next?
Once 50% of the seeds have germinated you can move the soil blocks from the heat mat. I prefer to take them out of the tub (less humidity at this stage will prevent the seedling from going leggy) and allow them to acclimatise indoors until the remaining of the seeds have popped up before placing back into the tub and moving outdoors. Reminder to keep an eye on watering at this time and do not allow to dry out.
When they are outside, you can place the tub lid on during the nighttime, this will protect them from heavy rain or slug attacks. While they are still young, do not subject them to harsh sunlight. This will quickly dry out the blocks and scorch the seedlings.
After about 4 weeks of growing in the micro blocks you will need to either pot on or transplant into the garden. Before you transplant into the garden, make sure to harden off sufficiently (gradually increasing the level of sun exposure over a period of 3 days.)
Cool hardy annuals thrive in Soil Blocks, here’s a list of my favourite varieties of cool flowers to start in March/April:
- Ranunculus
- Snapdragons
- Icelandic Poppies
- Stock
- Ammi majus or visnaga
- Orlaya
- Cornflower
- Nigella
- Calendula
- Larkspur
- Foxglove
- Phlox
- Statice
- Strawflower
- Matricaria
- Scabiosa
- Mignonette
- Buplureum
- Agrostemma
- Persian Cress
- Honeywort
- Sweet William
- Sweet Rocket
- Achillea
- Delphinium
- Tweedia
So, there you have it—your foolproof guide to soil blocking! Whether you’re working with a tiny grow space or simply looking to give your seedlings the best start possible, this method is a total game-changer. Not only will you save space, time, and resources, but you’ll also be nurturing healthier, happier plants from the get-go.
If you’ve been on the fence about trying soil blocking, consider this your sign to dive in. Give it a go, experiment with your mix, and watch as your seedlings flourish. Who knows? By this time next year, you might just be wondering how you ever gardened without it.
Happy sowing, garden besties!
Written for Gubba, by Elly Keen


